
How to Build a Serverless Image Analysis Pipeline on OCI
Introduction
I’m excited to share a project I’ve been working on that demonstrates a powerful, cloud-native pattern on OCI. This post also serves as a detailed step-by-step walkthrough based on my Oracle AIWorld technical session: Strategies for Migrating Serverless Applications to OCI [SHO1222] where I co-presented with my colleagues Tom Moore and Shadai Williams on October 15th, 2025.
👉 View the session details here.
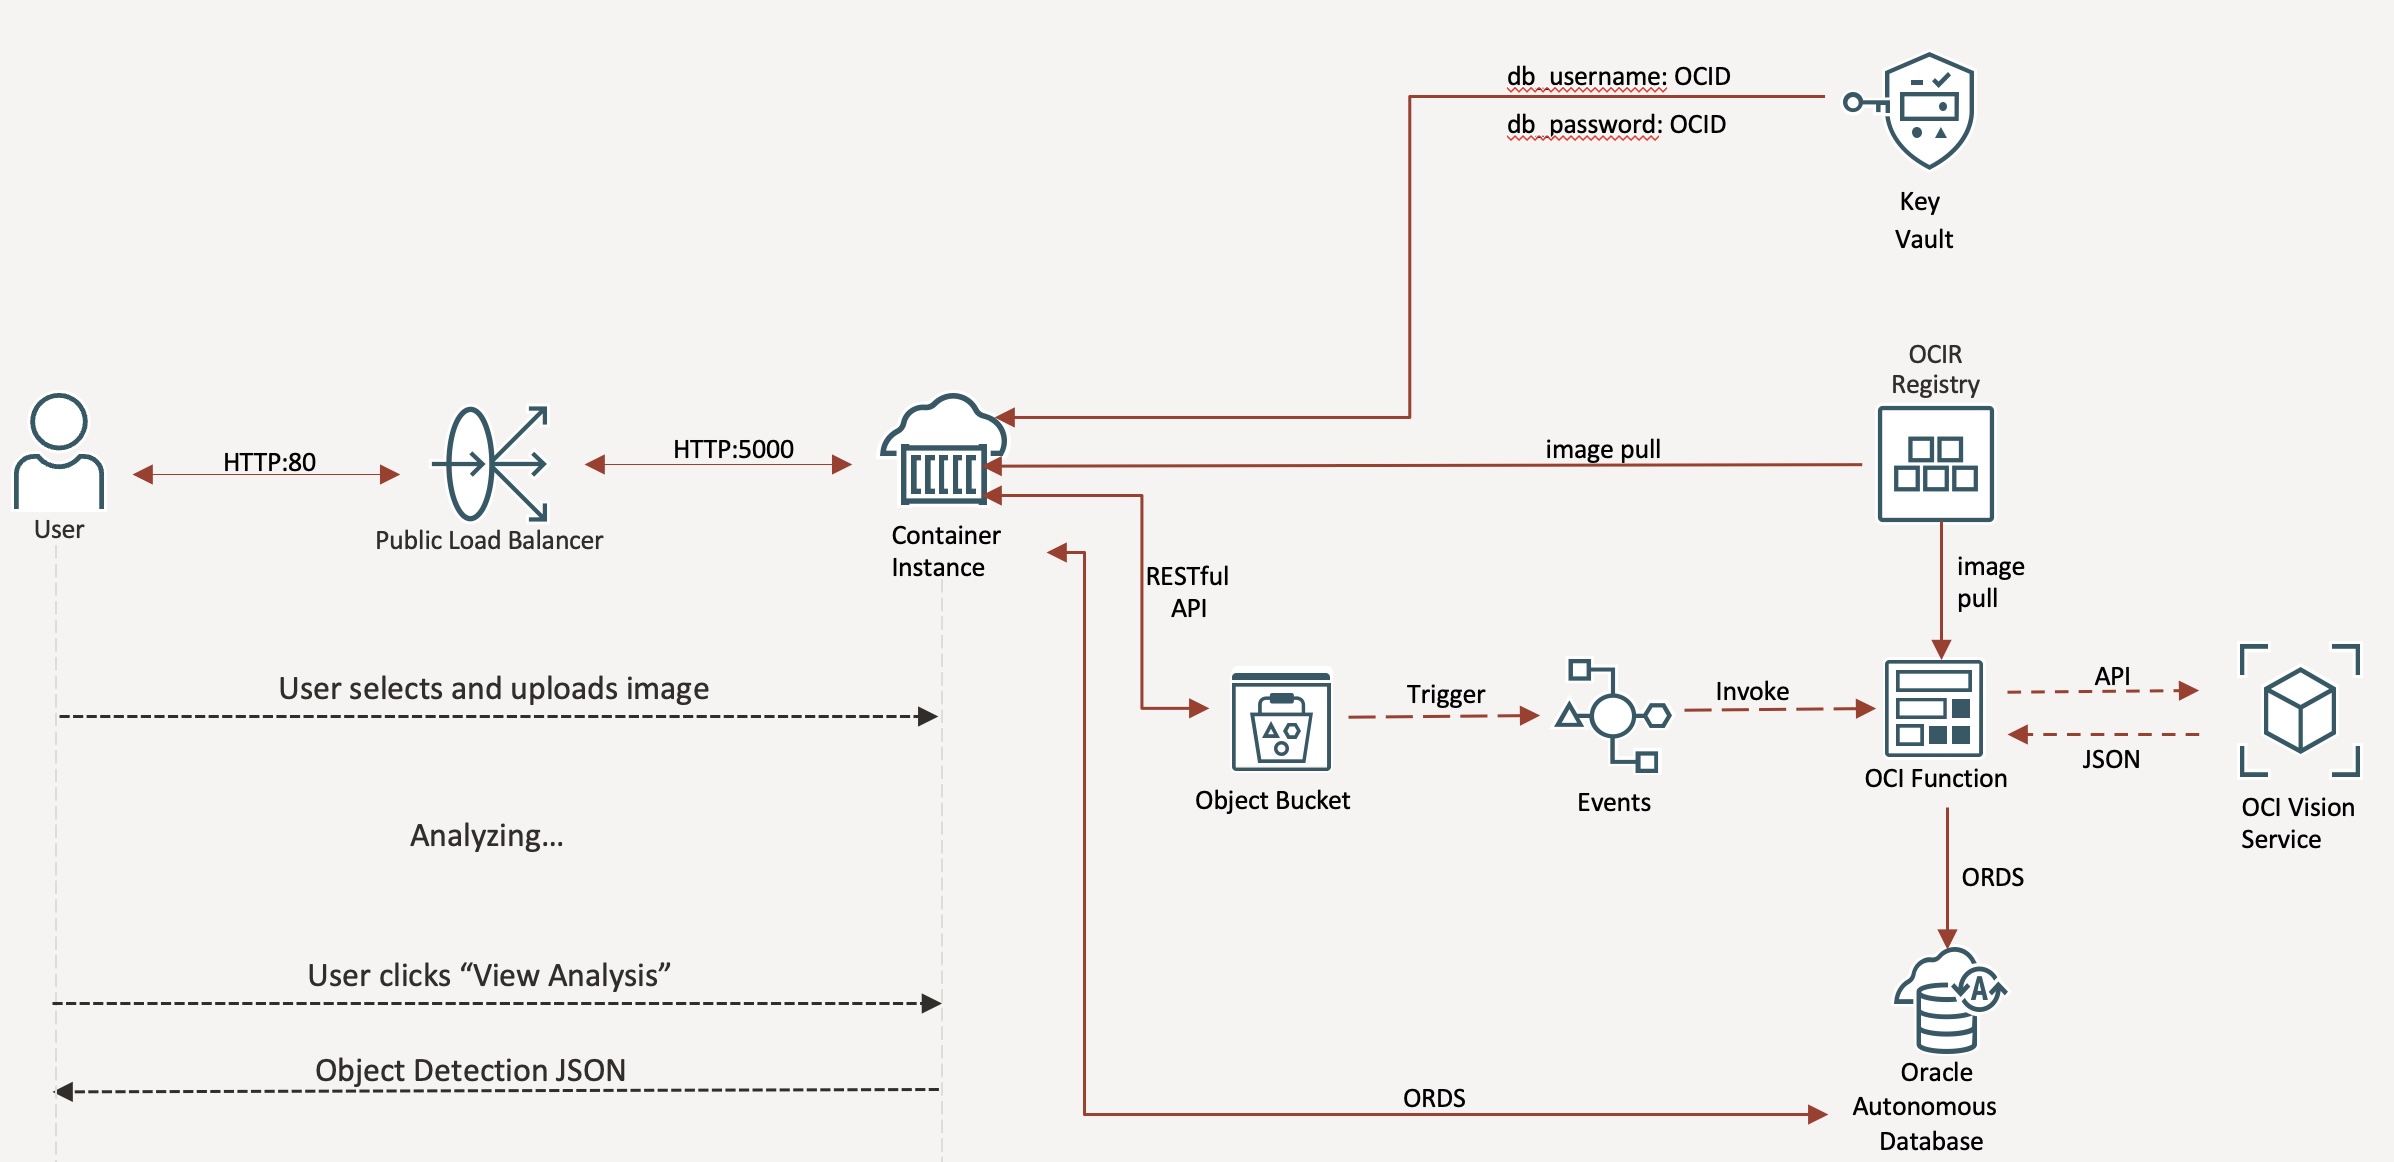
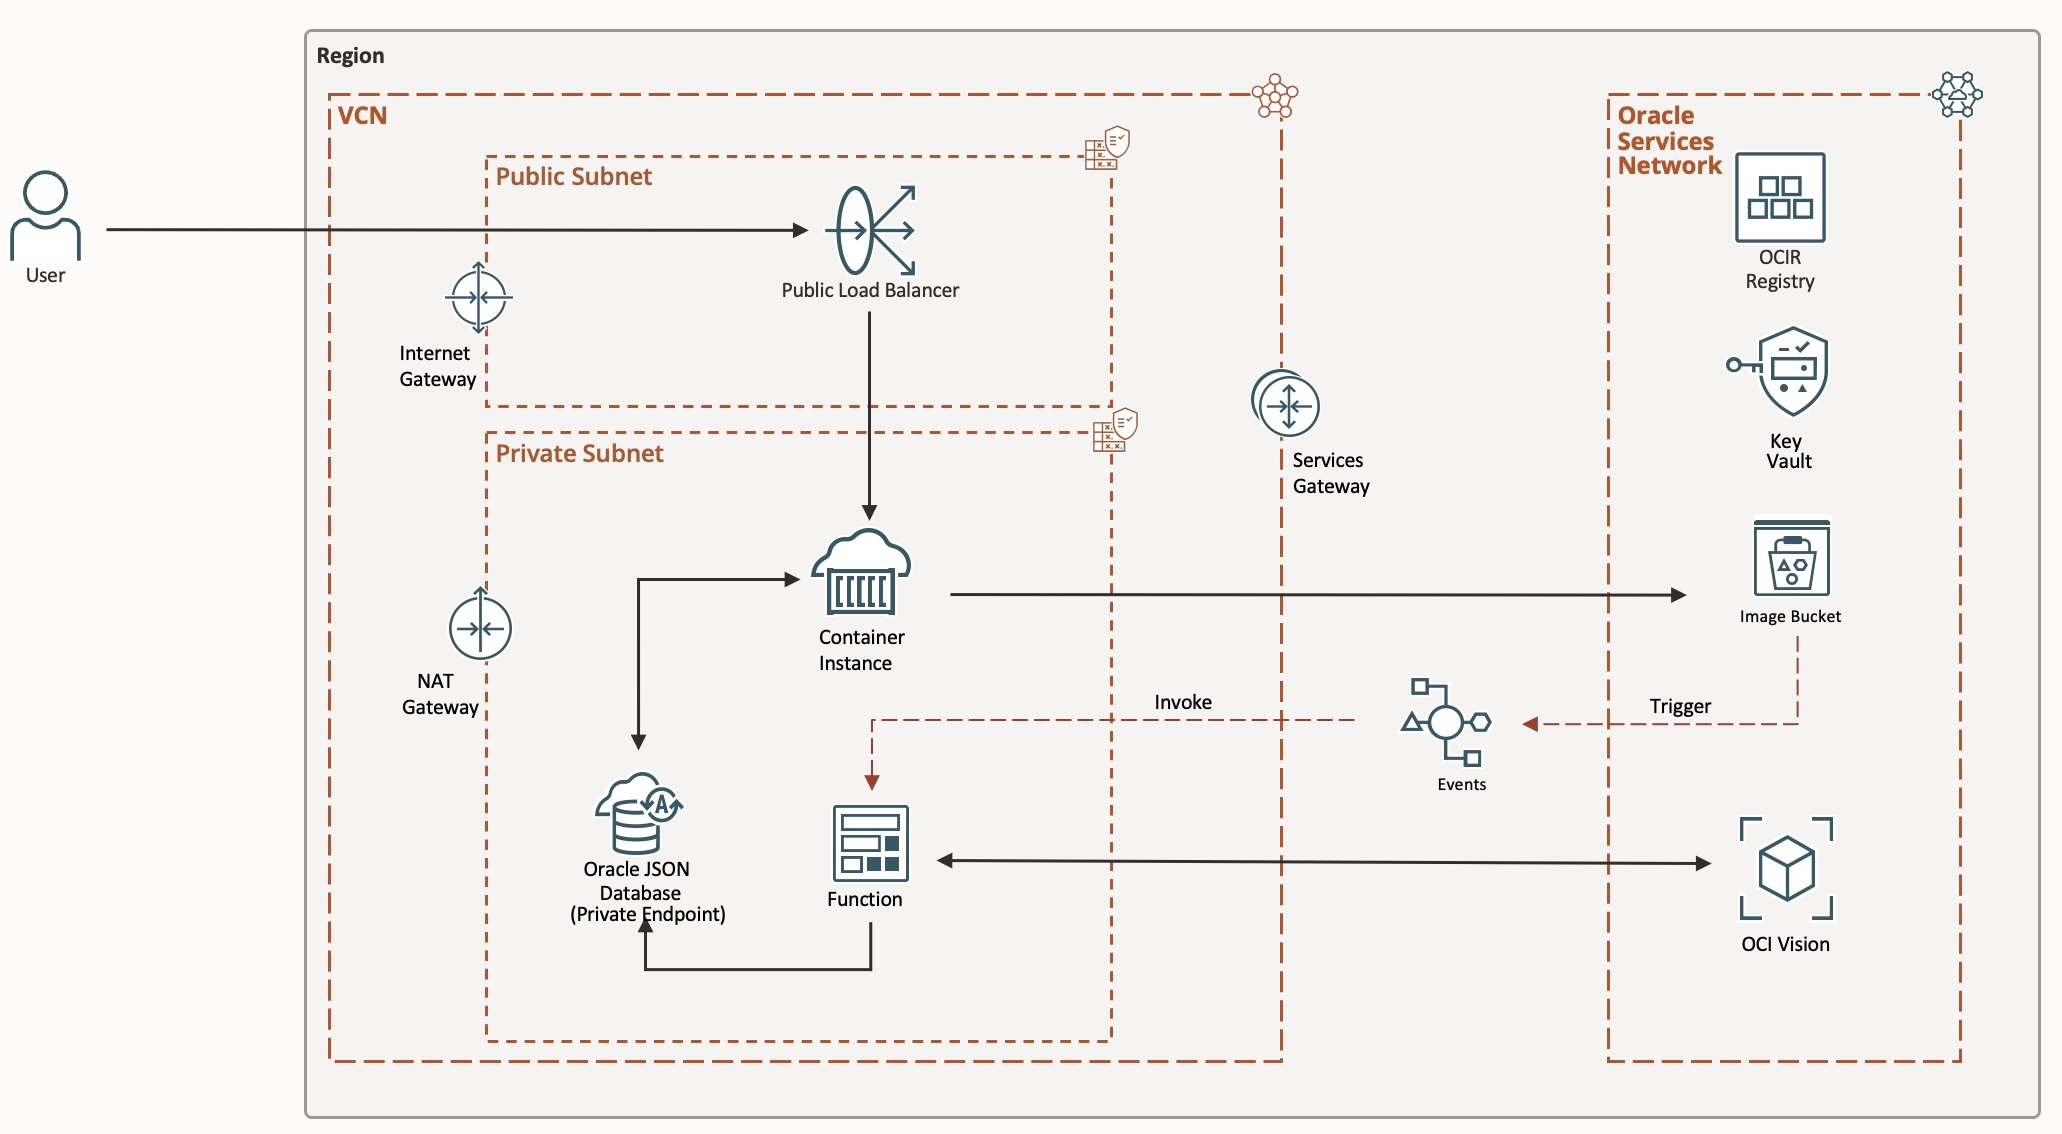
If you’ve ever wondered how to stitch together OCI Container Instances, OCI Functions, Object Storage, AI Vision, and an Autonomous Database into a cohesive serverless architecture, this tutorial is for you. Here’s a high-level look at what you’ll be building:
Why This Architecture Matters
The architecture you’ll build is an end-to-end serverless pipeline that leverages OCI’s Vision AI service, event-driven functions, and the Autonomous Database.
For added security, this architecture follows well-architected design practices using a Private Subnet for secure communications, OCI Vault for Autonomous Database secrets management, IAM Instance Principals and Autonomous Database private end-point.
It’s a secure, scalable, and enterprise-ready solution. Here’s an architecture diagram of what is created in OCI:
Potential use cases include:
- 📷 Image analysis pipelines: Auto-tagging, object detection, and metadata enrichment for media assets.
- 🏢 Enterprise workflows: Automating back-office tasks like insurance claims processing or inventory audits from photos.
- 🎓 Education & research: Allowing students to upload images and receive AI-assisted analysis through a web portal.
- ⚡ Cloud modernization: Re-platforming serverless applications from other clouds to OCI using Terraform for repeatable, automated deployments.
Project Overview
At a high level, the pipeline works as follows:
- A user uploads a image via the Web App which is behind a load balancer running in a container instance and has acess to the object storage bucket
- The new file triggers an OCI Function, which executes AI Vision object detection.
- The resulting JSON output is persisted in an Autonomous JSON Database via ORDS REST APIs.
- The results are rendered back in the web app’s dashboard for the user to see.
The Code Repository
The complete source code for this project is available in my public GitHub repository https://github.com/mattkferguson/oci-analyzeImage-func-jsonDB
The layout includes:
app/# The Web application (UI + APIs)vision_function/# The OCI Function handler for AI Visionmain.tf# The root Terraform module for infrastructure provisioningterraform.tfvars.example# An example variables fileDockerfile# The build definition for the Web App container image
Getting Started: Provision the OCI Infrastructure
This first set of steps are the most detailed, as we’ll provision all the necessary cloud infrastructure with some manual commands but mostly with Terraform. Once this is done, the rest of the process is straightforward.
Step 1: Get an OCI Account
You’ll need an Oracle Cloud Infrastructure account. If you don’t have one yet, you can sign up for the Free Tier, which should be sufficient for completing this tutorial. https://www.oracle.com/cloud/free/
Step 2: Install Prerequisites
Before you begin, make sure you have the following tools installed on your local machine:
- OCI CLI: Used for authenticating and interacting with your OCI tenancy.
Installation Docs - Podman or Docker: Needed to build and push the container images for the web app and the function.
- Terraform: The tool we’ll use for Infrastructure as Code (IaC).
OCI Get Started Guide
You can verify your installations with these commands:
oci --version
docker --version # or podman --version
terraform --version
Step 3: Manual IAM Configuration
This is a critical step. You must create the correct IAM policies and dynamic groups to allow your applications to securely authenticate to other OCI services.
CRITICAL NOTE for Tenancies with IAM Identity Domains: If your tenancy uses IAM Identity Domains (formerly IDCS), you MUST create the Dynamic Groups and Policies inside your specific domain.
-
Navigate to your Identity Domain:
- In the OCI Console, navigate to
Identity & Security->Domains. - Click on your specific domain (e.g.,
Default,OracleIdentityCloudService). - All of the following steps must be performed within this domain’s interface.
- In the OCI Console, navigate to
-
Create Dynamic Groups:
-
Inside your domain, navigate to
Dynamic groups. -
Create two groups:
- Name:
WebAppInstanceDynamicGroup- Matching Rule:
ALL {resource.type = 'computecontainerinstance', resource.compartment.id = '<YOUR_COMPARTMENT_OCID>'}
- Matching Rule:
- Name:
VisionFunctionDynamicGroup- Matching Rule:
ALL {resource.type = 'fnfunc', resource.compartment.id = '<YOUR_COMPARTMENT_OCID>'}
- Matching Rule:
(Replace
<YOUR_COMPARTMENT_OCID>with the OCID of your compartment). - Name:
-
-
Create IAM Policy:
- Navigate to
Policies. - Create a new policy named
VisionAppPolicyin your compartment with the following statements.
- Navigate to
Note the <DOMAIN_NAME>/ prefix required for the dynamic group names.
# --- Permissions for the Function ---
Allow dynamic-group <DOMAIN_NAME>/VisionFunctionDynamicGroup to use ai-service-vision-family in compartment id <YOUR_COMPARTMENT_OCID>
Allow dynamic-group <DOMAIN_NAME>/VisionFunctionDynamicGroup to read objectstorage-namespaces in compartment id <YOUR_COMPARTMENT_OCID>
Allow dynamic-group <DOMAIN_NAME>/VisionFunctionDynamicGroup to read compartments in compartment id <YOUR_COMPARTMENT_OCID>
# Required for the function to connect to the database
Allow dynamic-group <DOMAIN_NAME>/VisionFunctionDynamicGroup to use autonomous-databases in compartment id <YOUR_COMPARTMENT_OCID>
Allow dynamic-group <DOMAIN_NAME>/VisionFunctionDynamicGroup to use database-family in compartment id <YOUR_COMPARTMENT_OCID>

# --- Permissions for the Web App Container Instance ---
Allow dynamic-group <DOMAIN_NAME>/WebAppInstanceDynamicGroup to manage object-family in compartment id <YOUR_COMPARTMENT_OCID> where target.bucket.name = 'oci-image-analysis-bucket'
# Required for the web app to connect to the database
Allow dynamic-group <DOMAIN_NAME>/WebAppInstanceDynamicGroup to use autonomous-databases in compartment id <YOUR_COMPARTMENT_OCID>
Allow dynamic-group <DOMAIN_NAME>/WebAppInstanceDynamicGroup to use database-family in compartment id <YOUR_COMPARTMENT_OCID>

# --- Permission for web app to read secrets and use keys from Vault Service ---
Allow dynamic-group <DOMAIN_NAME>/WebAppInstanceDynamicGroup to read secret-family in compartment id <YOUR_COMPARTMENT_OCID>`
Allow dynamic-group <DOMAIN_NAME>/WebAppInstanceDynamicGroup to use keys in compartment id <YOUR_COMPARTMENT_OCID>`

# --- Permissions for logging  ---
Allow service logging to use functions-family in compartment id <YOUR_COMPARTMENT_OCID>
*(Replace <DOMAIN_NAME> with the name of your identity domain, e.g., Default or OracleIdentityCloudService).
*(Replace <YOUR_COMPARTMENT_OCID> with the OCID of your compartment).
Step 4: Collect the values you’ll put in terraform.tfvars
You’ll create an API key for your user and copy a few identifiers from the Console. Here’s exactly what you need and where to find each item:
tenancy_ocid– Tenancy OCID
- In the OCI console: click your avatar (top right) → Tenancy:
→ Tenancy OCID → Copy.
user_ocid– User OCID
- In the OCI console: click your avatar → User settings → OCID → Copy.
fingerprint– API key fingerprint for your user
- In the OCI console: User settings → API Keys → Add API Key → choose Paste Public Key (see key generation below) → after adding, copy the Fingerprint shown in the table.
private_key_path– Local path to your API key’s private key
- You’ll store the private key on your machine (e.g.,
~/.oci/oci_api_key.pem).
region– Your home region code (e.g.,us-ashburn-1,ca-toronto-1, etc.)
- Console: top-nav region selector shows your current region’s code.
- (Optional) CLI list:
oci iam region list --query "data[].name" --raw-output
compartment_ocid– Target compartment OCID- Console: Identity & Security → Compartments → pick (or create) a compartment → Copy OCID.
Key Generation (one-time)
If you don’t already have an OCI API key for your user:
mkdir -p ~/.oci
openssl genrsa -out ~/.oci/oci_api_key.pem 2048
openssl rsa -pubout -in ~/.oci/oci_api_key.pem -out ~/.oci/oci_api_key_public.pem
chmod 600 ~/.oci/oci_api_key.pem
Step 5: Create and fill in terraform.tfvars file
Copy the template below into a new file named terraform.tfvars in the repo root and replace the placeholder values with the ones you collected above.
# Copy this file to terraform.tfvars and fill in your values

# Find these values in the OCI Console:
tenancy_ocid      = "ocid1.tenancy.oc1..aaaaaaaa..."         # Console → Tenancy Information
user_ocid         = "ocid1.user.oc1..aaaaaaaa..."            # Console → User Settings
fingerprint       = "xx:xx:xx:xx:xx:xx:xx:xx:xx:xx:xx:xx:xx:xx:xx:xx"  # Console → User → API Keys → Fingerprint
private_key_path  = "~/.oci/oci_api_key.pem"                  # Local path to your private key
region            = "ca-toronto-1"                            # e.g., us-ashburn-1, ca-toronto-1
compartment_ocid  = "ocid1.compartment.oc1..aaaaaaaa..."      # Identity & Security → Compartments
Initialize and Plan the Deployment
Everything needed to build and deploy all the necessary OCI resources is in the main.tf config file. It will create your VNC (with secuirty rules & routes), a load-balancer, an object Storage bucket, OCIR, container instance, function application, OCI vault and an Autonomous JSON Database. With your variables defined, run the following commands from the root of the repository to ensure everything is configured correctly:
terraform init
terraform plan   # should succeed and show the resources to be created
If you encounter authentication errors, double-check your OCIDs, fingerprint, and the path to your private key.
If you hit auth or permission errors:
- Re-check the fingerprint and private key path.
- Confirm your user has permission to manage resources in the chosen compartment (IAM policies).
- Make sure the region string exactly matches the Console (e.g., us-ashburn-1).
The Web App and the Serverless Function
Take some time to familiarize yourself with the Container Instance Web App
The Web app provides a simple UI for users to upload images. The key part of the code is how it authenticates to OCI services. It uses a resource principal signer, which allows the application running inside the OCI Container Instance to securely authenticate using an IAM policy, without needing to handle any static credentials.
# app/app.py
from flask import Flask, request, render_template
import oci
import requests, json, os

app = Flask(__name__)

# OCI resource principal signer
signer = oci.auth.signers.get_resource_principals_signer()
object_storage_client = oci.object_storage.ObjectStorageClient(config={}, signer=signer)

@app.route("/", methods=["GET", "POST"])
def upload():
    if request.method == "POST":
        file = request.files["file"]
        object_storage_client.put_object(
            "my-namespace",
            "image-uploads",
            file.filename,
            file
        )
    return render_template("index.html")
Understanding the Serverless AI Vision Function
When a new image lands in our Object Storage bucket, an Events rule automatically triggers this function. Like the web app, the function also uses a resource principal for secure authentication to call the Vision and Object Storage services.
The function’s logic is simple:
- Parse the incoming event data to get the uploaded file’s name and bucket.
- Call the AI Vision service to perform object detection on that file.
- Post the structured JSON results to the Autonomous Database via its ORDS REST endpoint.
# vision_function/func.py
import io, json, oci

def handler(ctx, data: io.BytesIO = None):
    signer = oci.auth.signers.get_resource_principals_signer()
    vision_client = oci.ai_vision.AIServiceVisionClient(config={}, signer=signer)
    obj_storage_client = oci.object_storage.ObjectStorageClient(config={}, signer=signer)

    evt = json.loads(data.getvalue())
    bucket = evt["data"]["resourceName"].split("buckets/")[1].split("/")[0]
    name   = evt["data"]["resourceName"].split("/")[-1]

    # Run AI Vision
    resp = vision_client.analyze_image(
        analyze_image_details=oci.ai_vision.models.AnalyzeImageDetails(
            features=[oci.ai_vision.models.ImageObjectDetectionFeature()],
            image=oci.ai_vision.models.ImageObjectStorageUri(
                source_uri=f"oci://{bucket}@namespace/{name}"
            )
        )
    )

    detections = [obj.name for obj in resp.data.image_objects]
    # Persist via ORDS
    ords_url = os.environ["ORDS_URL"]
    payload = {"file": name, "detections": detections}
    requests.post(ords_url, auth=("user","pass"), json=payload)

    return {"status": "success", "detections": detections}
A Note about the Autonomous JSON Database via ORDS
By enabling ORDS on our Autonomous JSON Database, we get a secure REST API for our data. This is powerful because it means our function and web app don’t need database drivers, wallets, or direct SQL connections. They just make simple HTTP requests.
Step 6: Deploy and Test
Now it’s time to bring it all together.
- Apply the Terraform Configuration. This command will create all the OCI resources defined in your .tf files, including the database, container repository, container web app instance, function, and network, load-balancer.
terraform apply --auto-approve
Step 7 Build, Tag and Deploy Web App and Function
Generate Auth Token for Oracle Oracle Cloud Infrastructure Registry (OCIR). This is where the Web App and Function container images are stored, shared, and managed when pulled during deployment/invocation.
In the OCI Console, go to Profile → User Settings → Auth Tokens
Click “Generate Token” with the description: “OCIR Docker Login”. Copy the generated token immediately (it won’t be shown again)
Get your tenancy namespace and region key from the terraform apply output
TENANCY_NAMESPACE=$(terraform output -raw tenancy_namespace)
REGION_KEY=$(terraform output -raw region_key)

# Login with your OCI username and auth token
echo 'YOUR_AUTH_TOKEN' | podman login ${REGION_KEY}.ocir.io --username "${TENANCY_NAMESPACE}/[email protected]" --password-stdin

# Example:
# echo 'A1B2C3...' | podman login yyz.ocir.io --username '<namespace>/<email address' --password-stdin
- Build and Push the Container Images After terraform apply completes, it will output the necessary values, like the URL for your new container repository. Use that URL to tag and push your images.
For the Web App:
# Get repository URLs
APP_IMAGE_URL=$(terraform output -raw app_image_full_url)
FUNCTION_IMAGE_URL=$(terraform output -raw function_image_full_url)

# Build and push web app
podman build --platform=linux/amd64 -t oci-image-upload-app-ajd:latest -f Dockerfile .
podman tag oci-image-upload-app-ajd:latest $APP_IMAGE_URL
podman push $APP_IMAGE_URL

# Build and push function
podman build --platform=linux/amd64 -t vision-analyzer-func-ajd:latest -f vision_function/Dockerfile .
podman tag vision-analyzer-func-ajd:latest $FUNCTION_IMAGE_URL
podman push $FUNCTION_IMAGE_URL
Finalizing the Deployment with Your Container Images
Important: This project uses a two-step deployment process
The first terraform apply uses placeholder images (use_placeholder_images = true) to create all the necessary infrastructure, including the Container Repository (OCIR). Once the repository exists, you must push your custom images to it and then run terraform apply a second time to point the services to your new images.
Follow these steps after your initial deployment:
-
Build and Push Your Images
-
Ensure you have successfully built, tagged, and pushed both the
oci-imageupload-ajd:latestand thevision-analyzer-func-ajd:latestcontainer images to the repository in OCIR. -
Double check that you’ve set your terraform.tfvars to
use_placeholder_images = falseas this updates the Web App container instance and Function to use the new IMAGE URL and pull from OCIR.
-
-
Run terraform apply Again
- Apply the configuration one last time via the
terraform applycommand
- Apply the configuration one last time via the
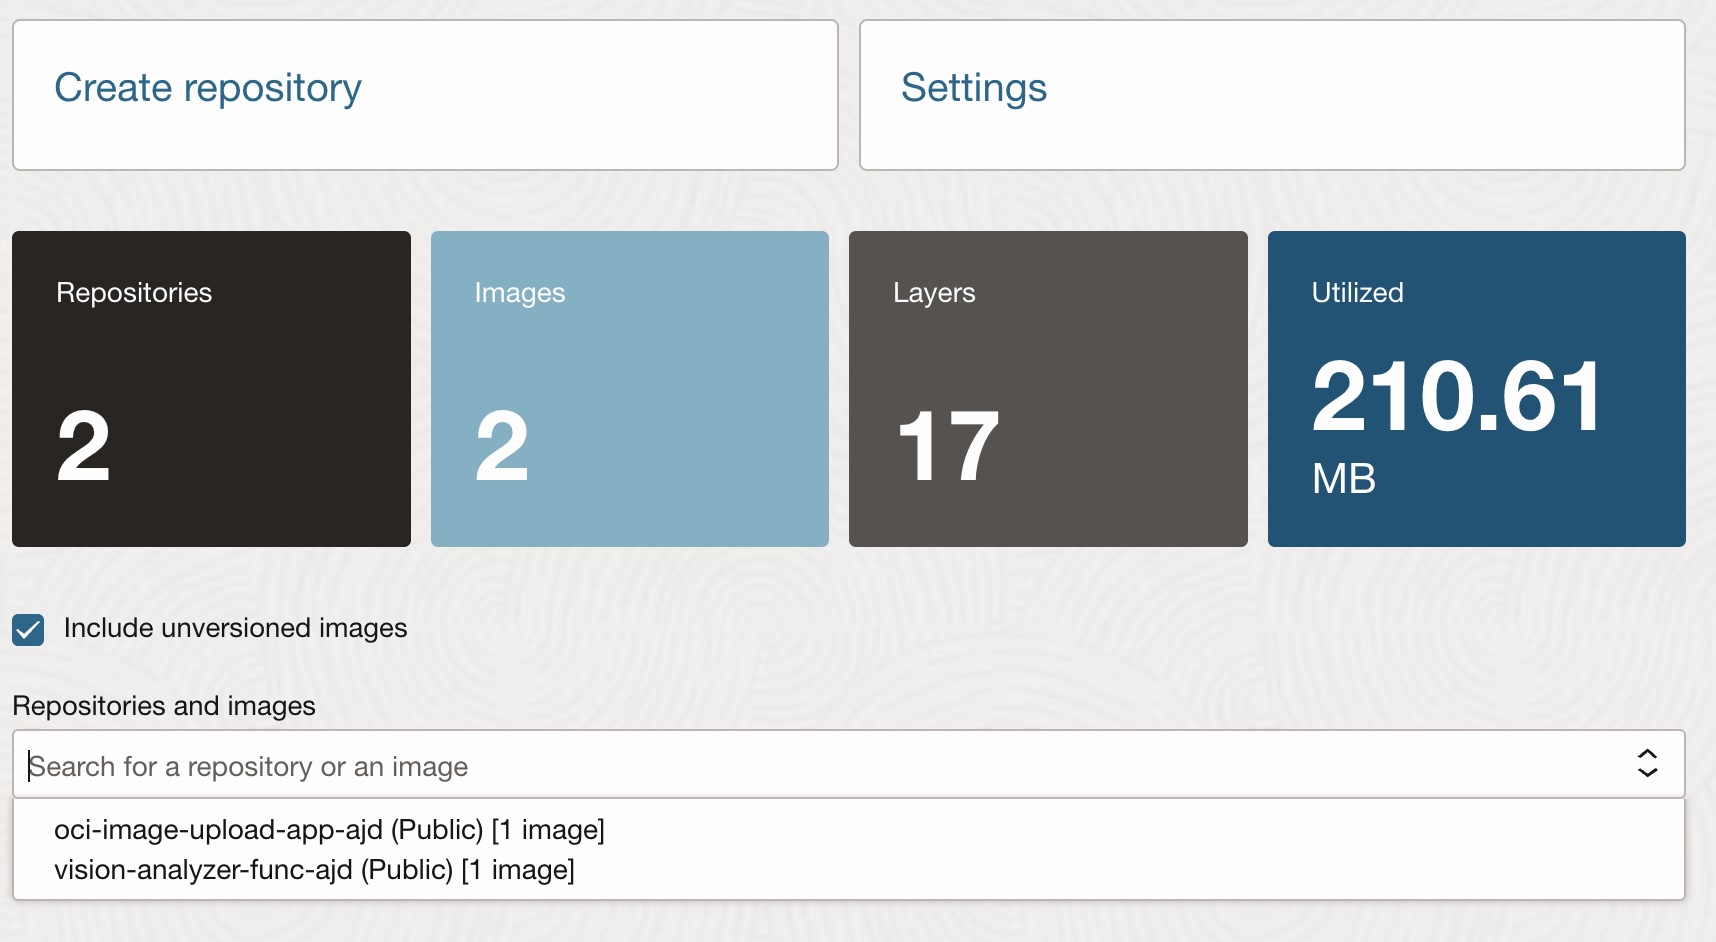
To verify, in the OCI console that your images have been successfully uploaded you can go to Developer Services -> Container Registry and you should see 2 Repositories and 2 Images:
- Update
terraform.tfvars- Modify your
terraform.tfvarsfile and set theuse_placeholder_imagesvariable to false. This tells Terraform to stop using the temporary placeholders and switch to the actual images you just pushed.
- Modify your
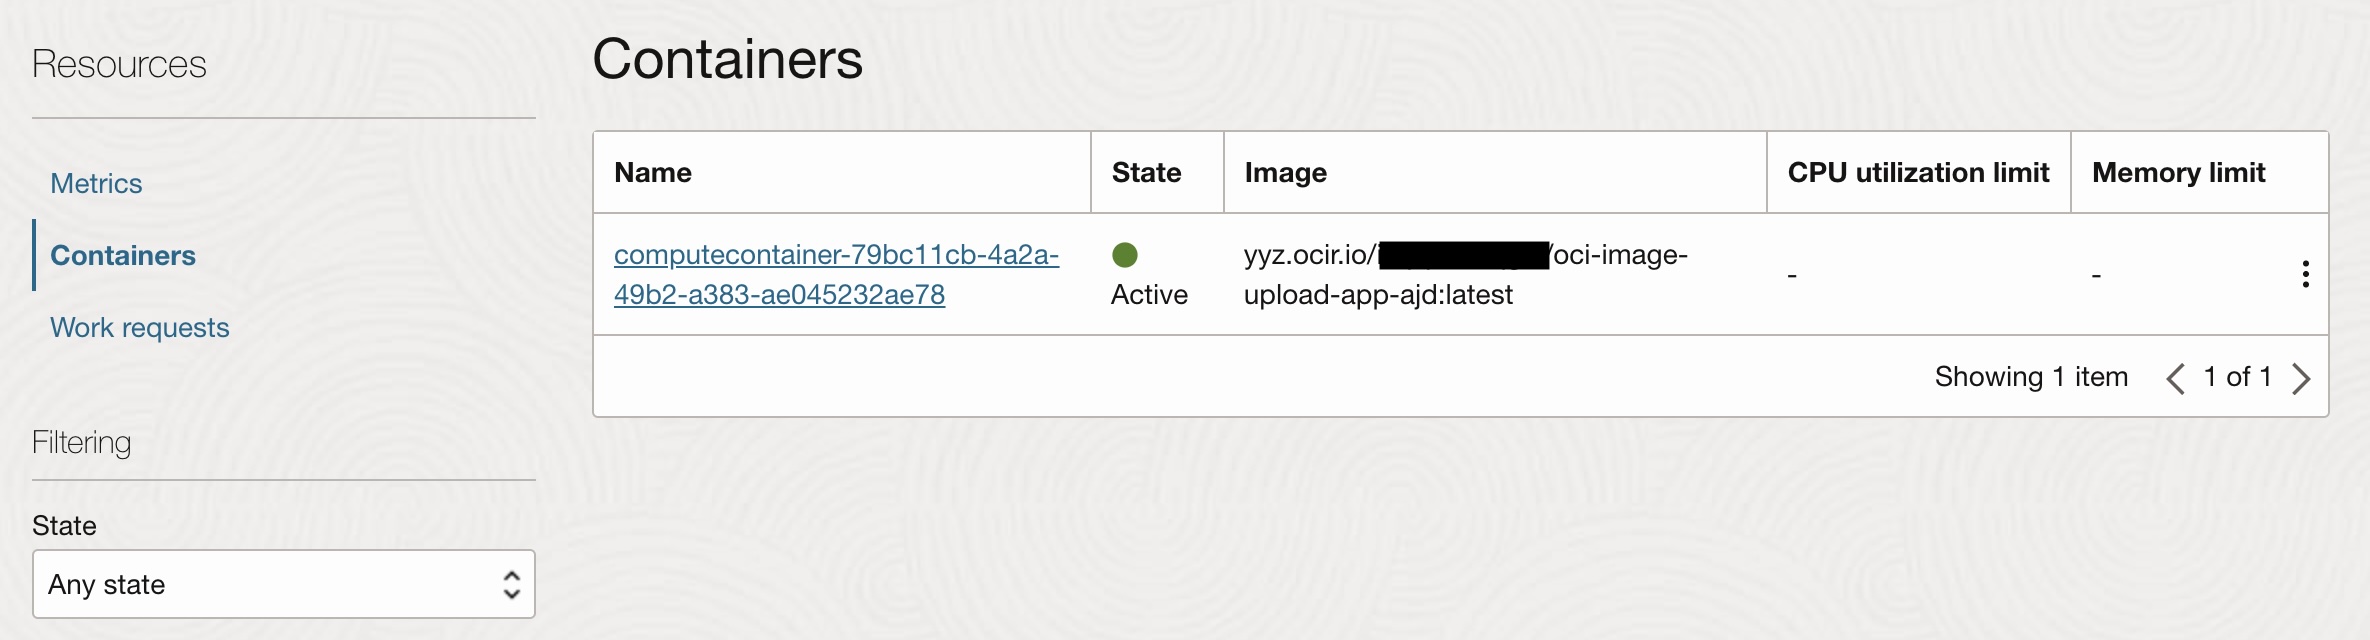
Additionally, it’s a good idea to confirm via the OCI console that both the Web App container instance and the Function have the correct Image URLs.
For the Web App Container Instance navigate to Developer Services -> Container Instances -> oci-image-upload-app-ajd-> containers
For the Function navigate to Developer Services -> Applications -> vision-application -> Functions tab

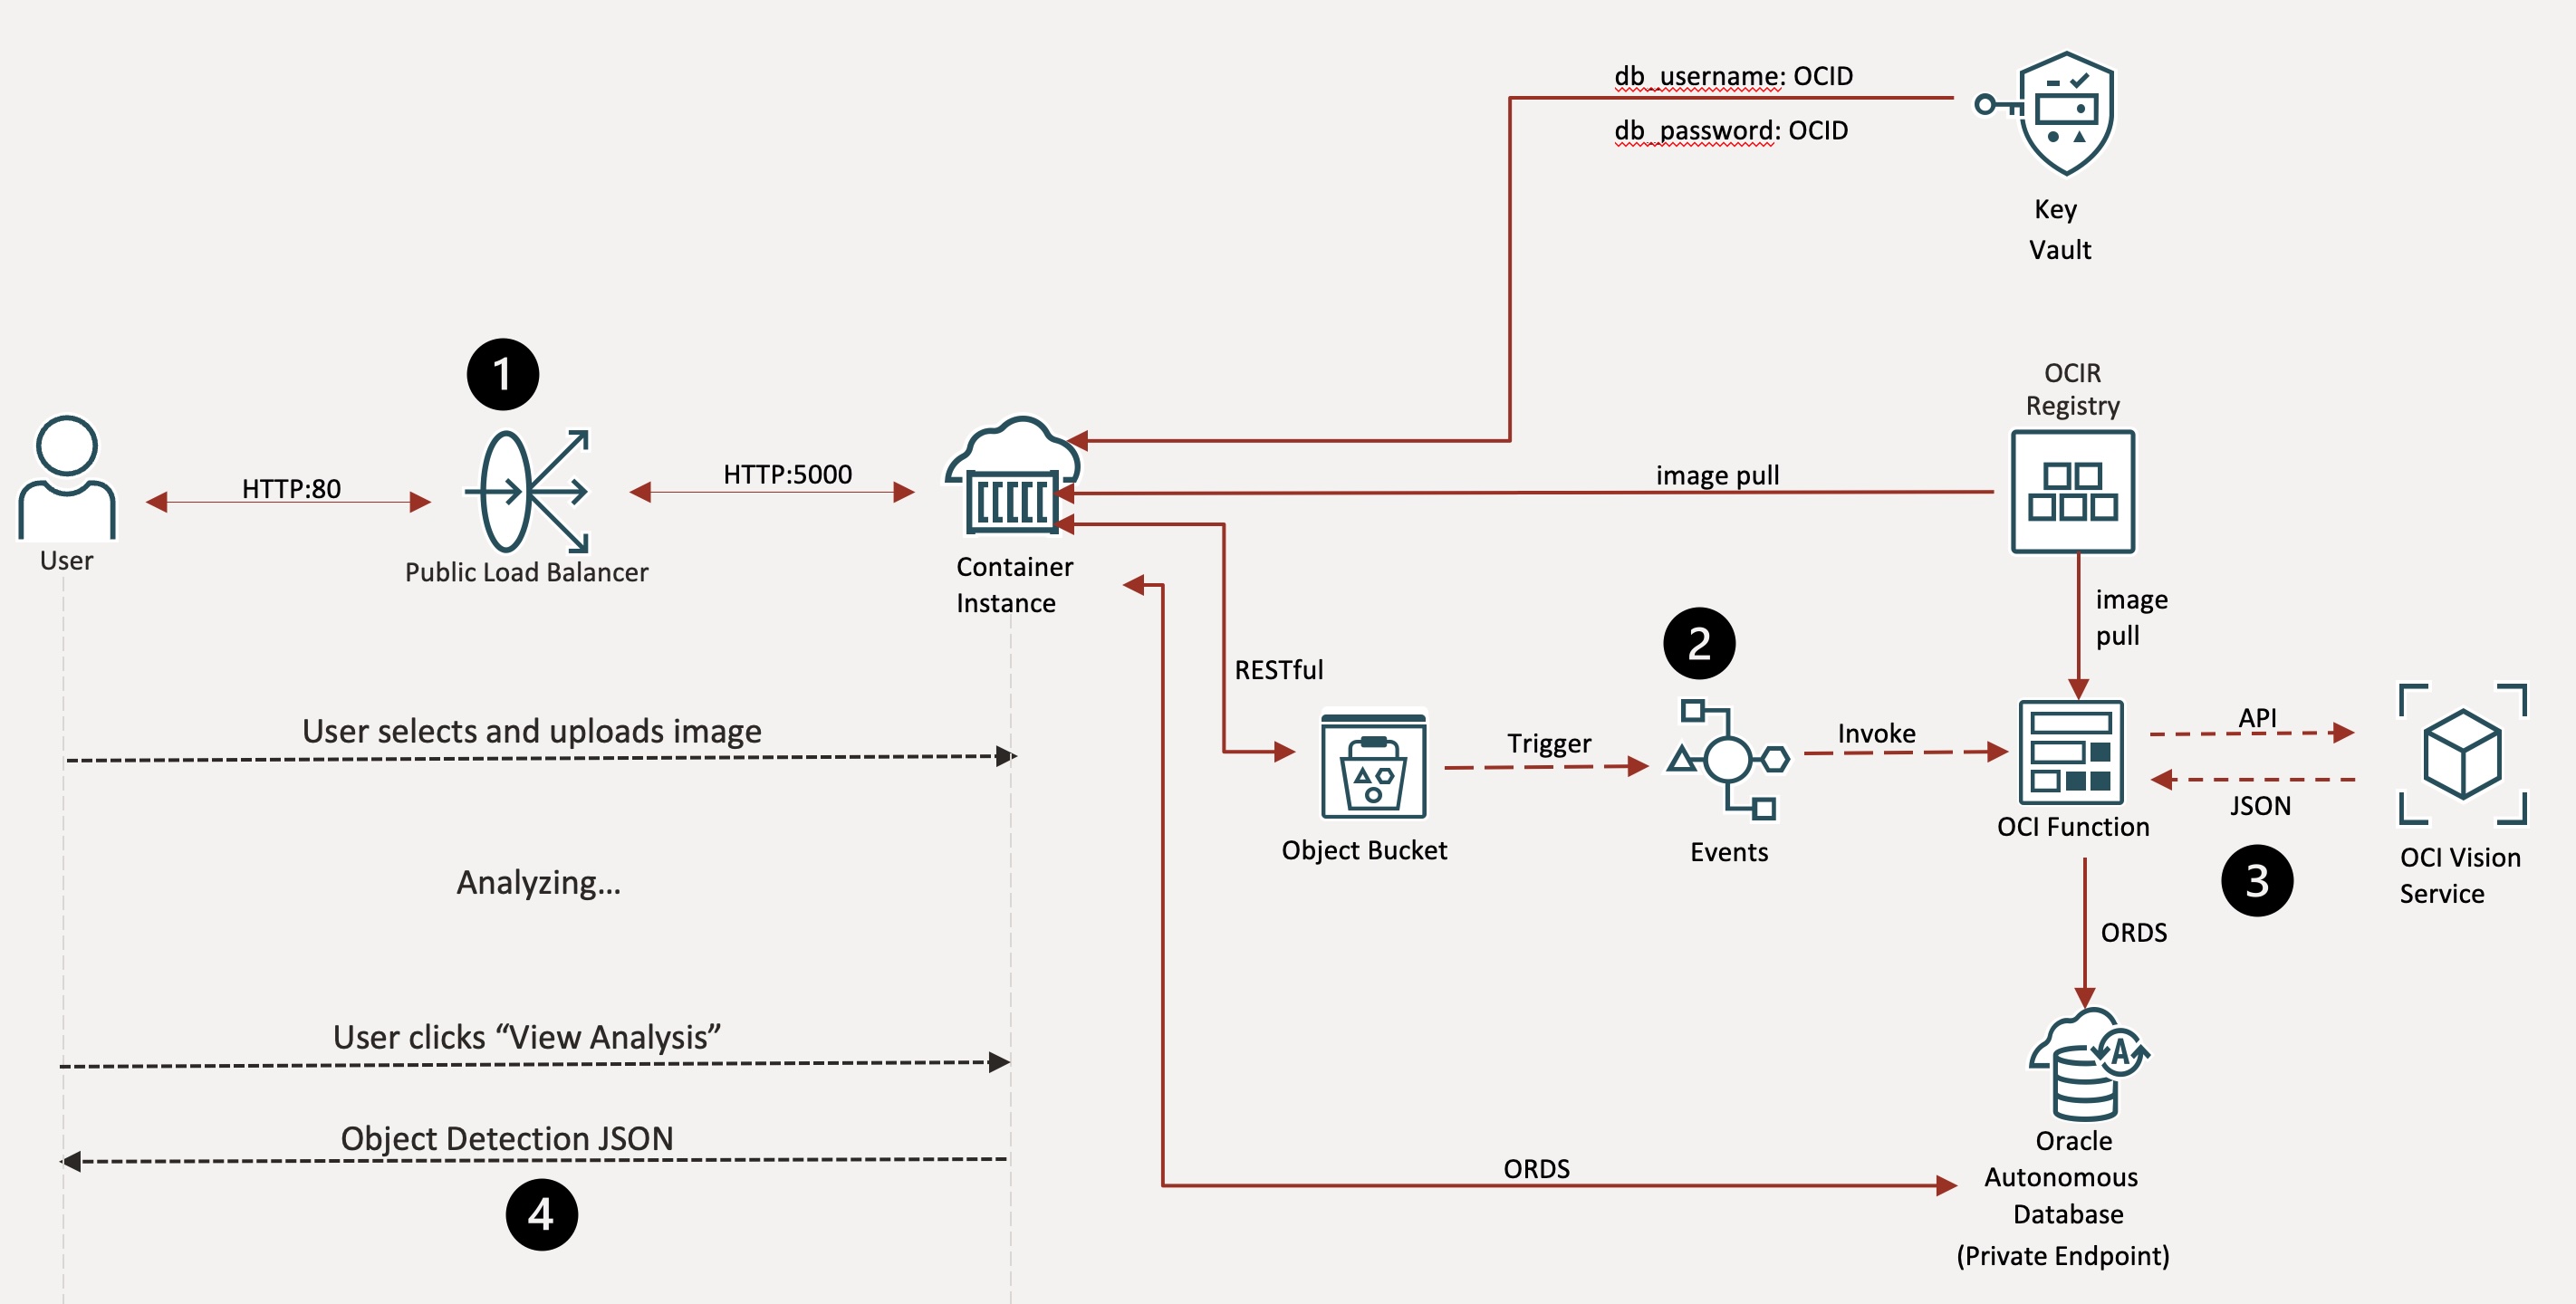
Testing Your Deployed Application
With the pipeline deployed, you are now ready to test it end-to-end.
Accessing the Web App
First, you need the public IP address of the application’s load balancer. You can find this in two ways:
- From the Terraform output: The IP address is provided as an output at the end of a successful
terraform apply - From the OCI Console: navigate to
Networking→Load Balancers
Once you have the IP, follow these steps:
- Open the application by pasting the public IP address into your web browser. You should see the main upload page.
- Choose an image from your local machine and click the Upload button. The page will refresh and display an “Analyzing…” message.
Note: The serverless function may take up to 30 seconds to process the image. You may need to manually refresh your browser to see the result.
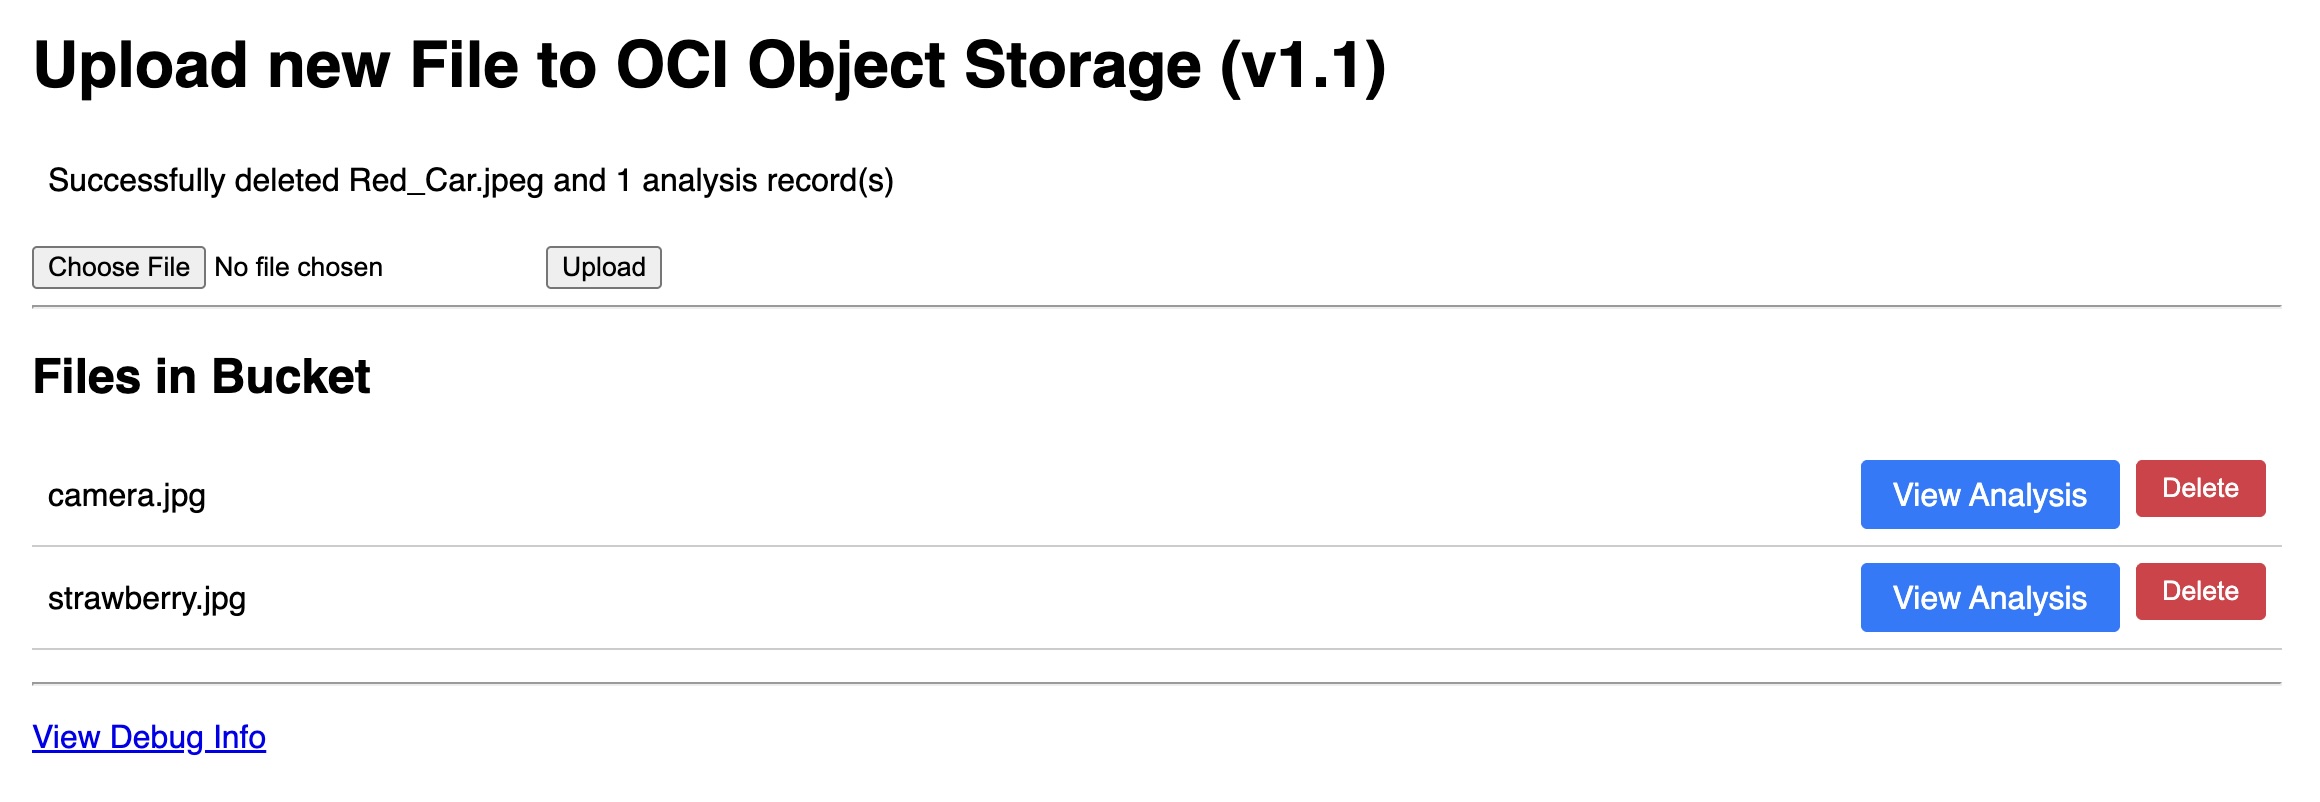
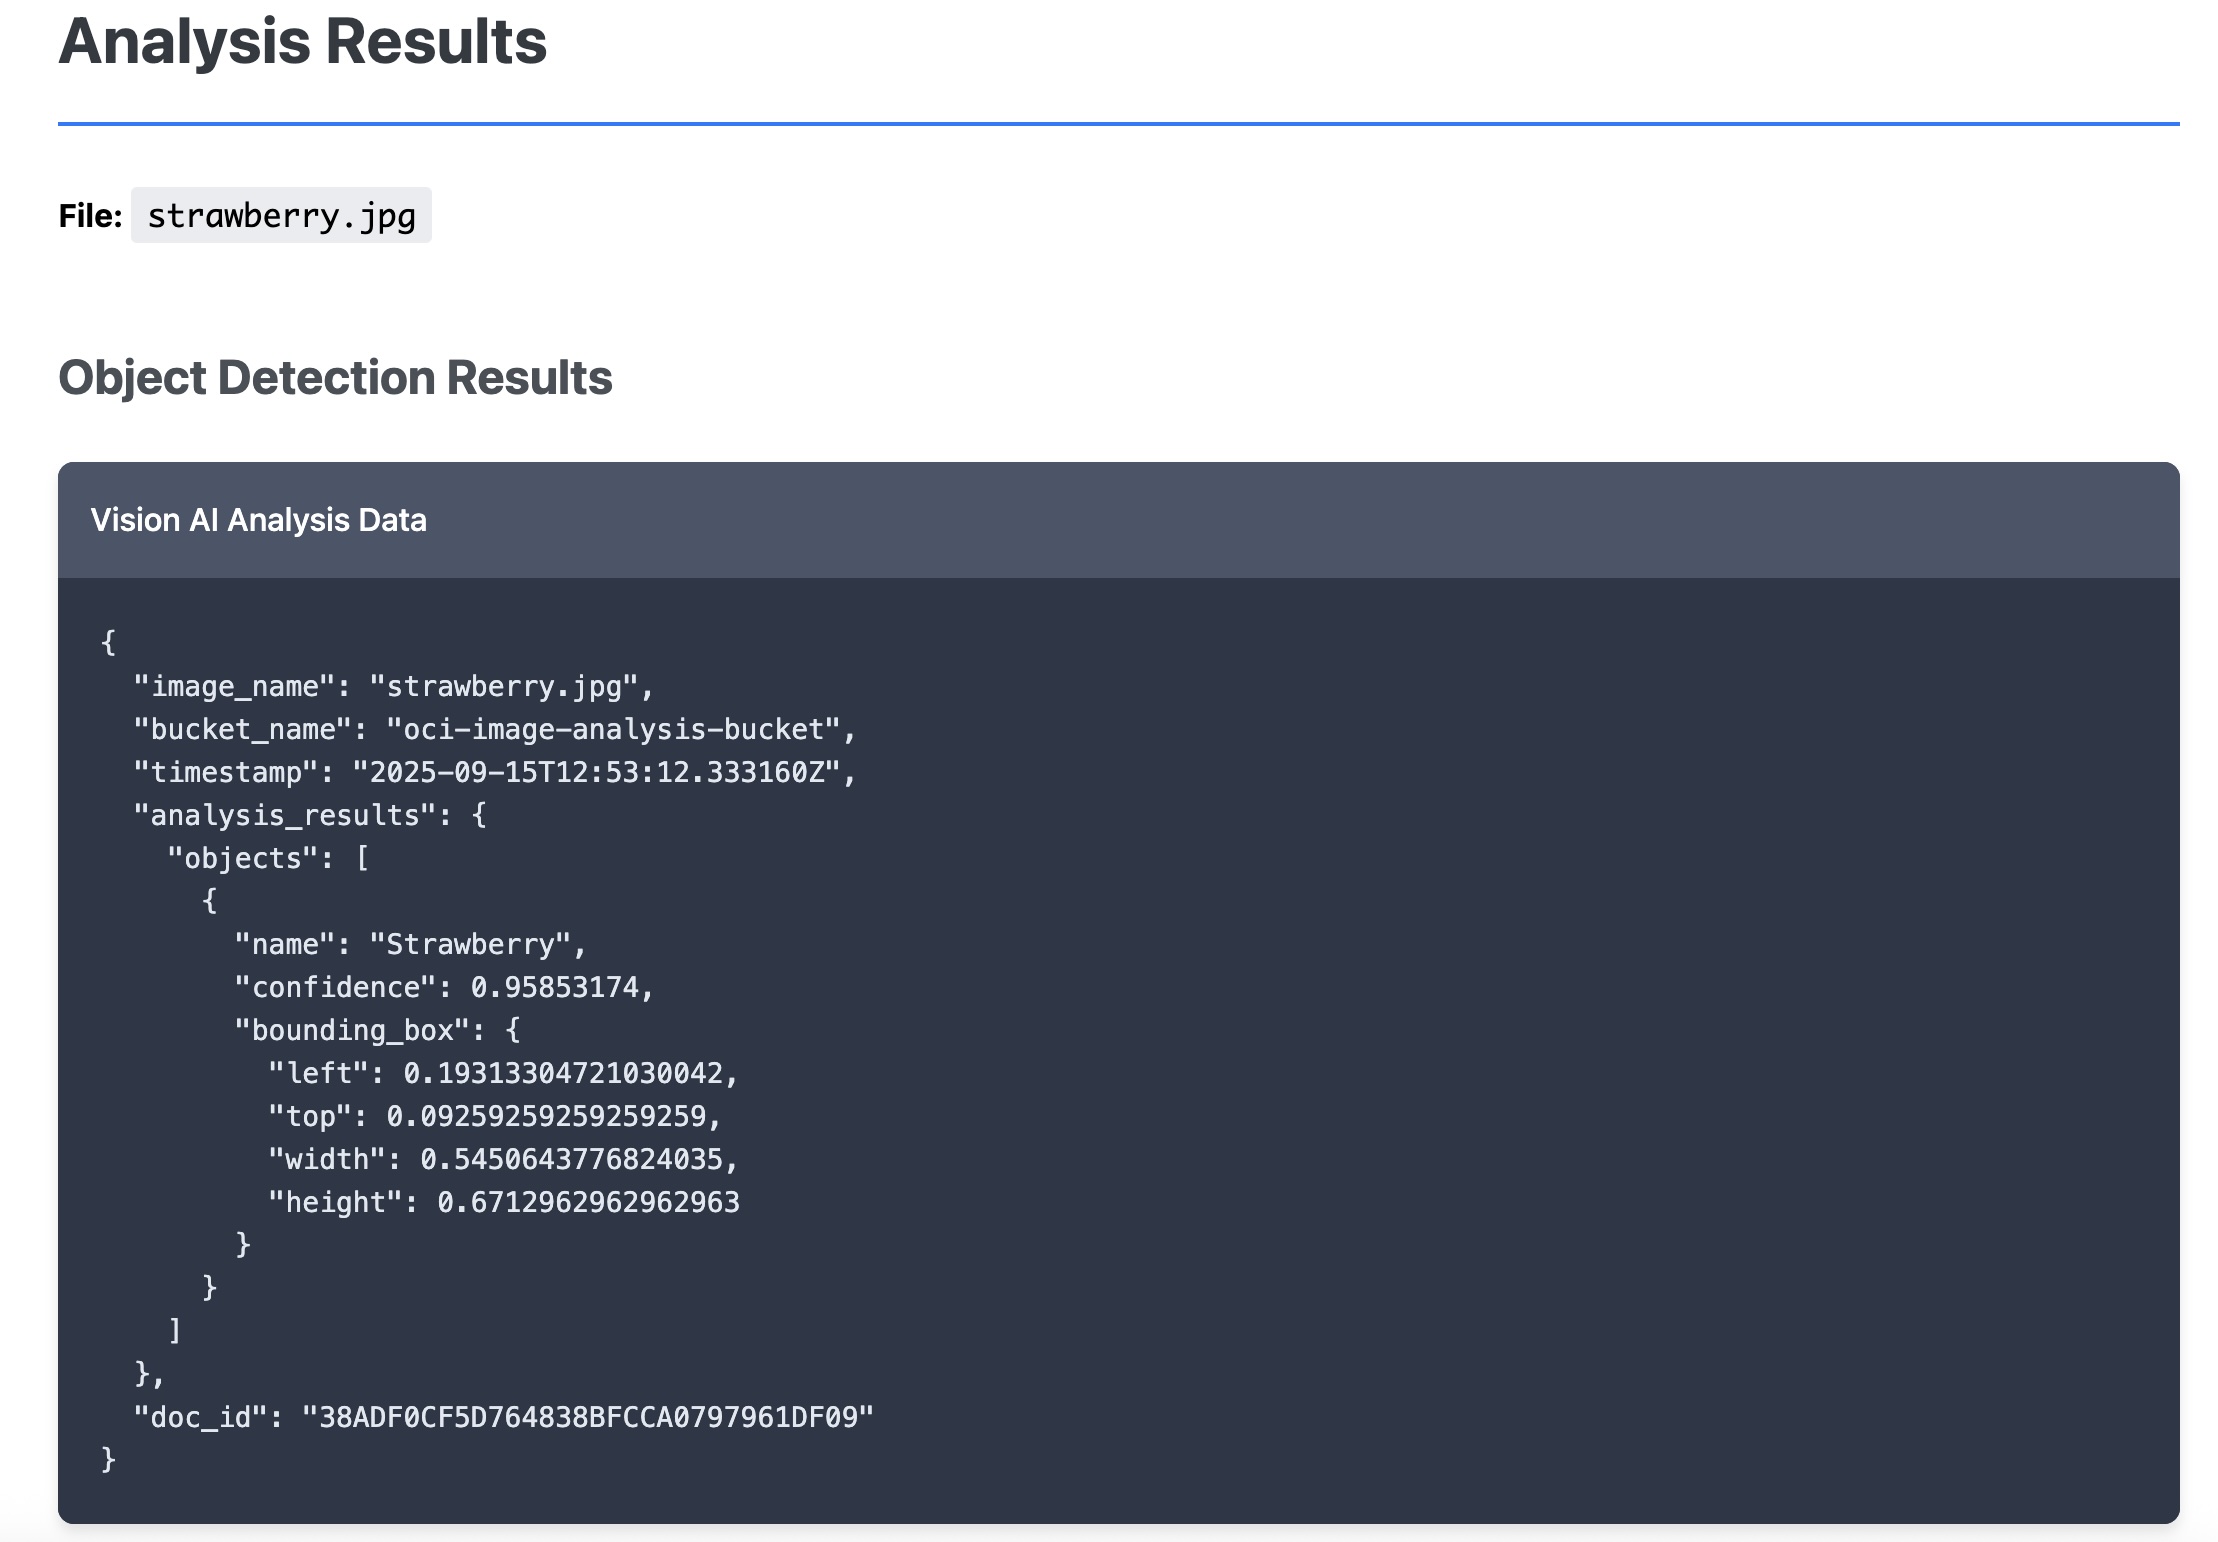
Once successful, a View Analysis button will appear. Click it to see the raw JSON output from the AI Vision service.
Verify the Data in the Database
You can also confirm that the analysis results were saved correctly in your Autonomous JSON Database.
- In the OCI Console, navigate to Oracle Database → Autonomous Database
- Click on the VisionJsonDB database instance from the list
- On the database details page, click the Database Actions button.
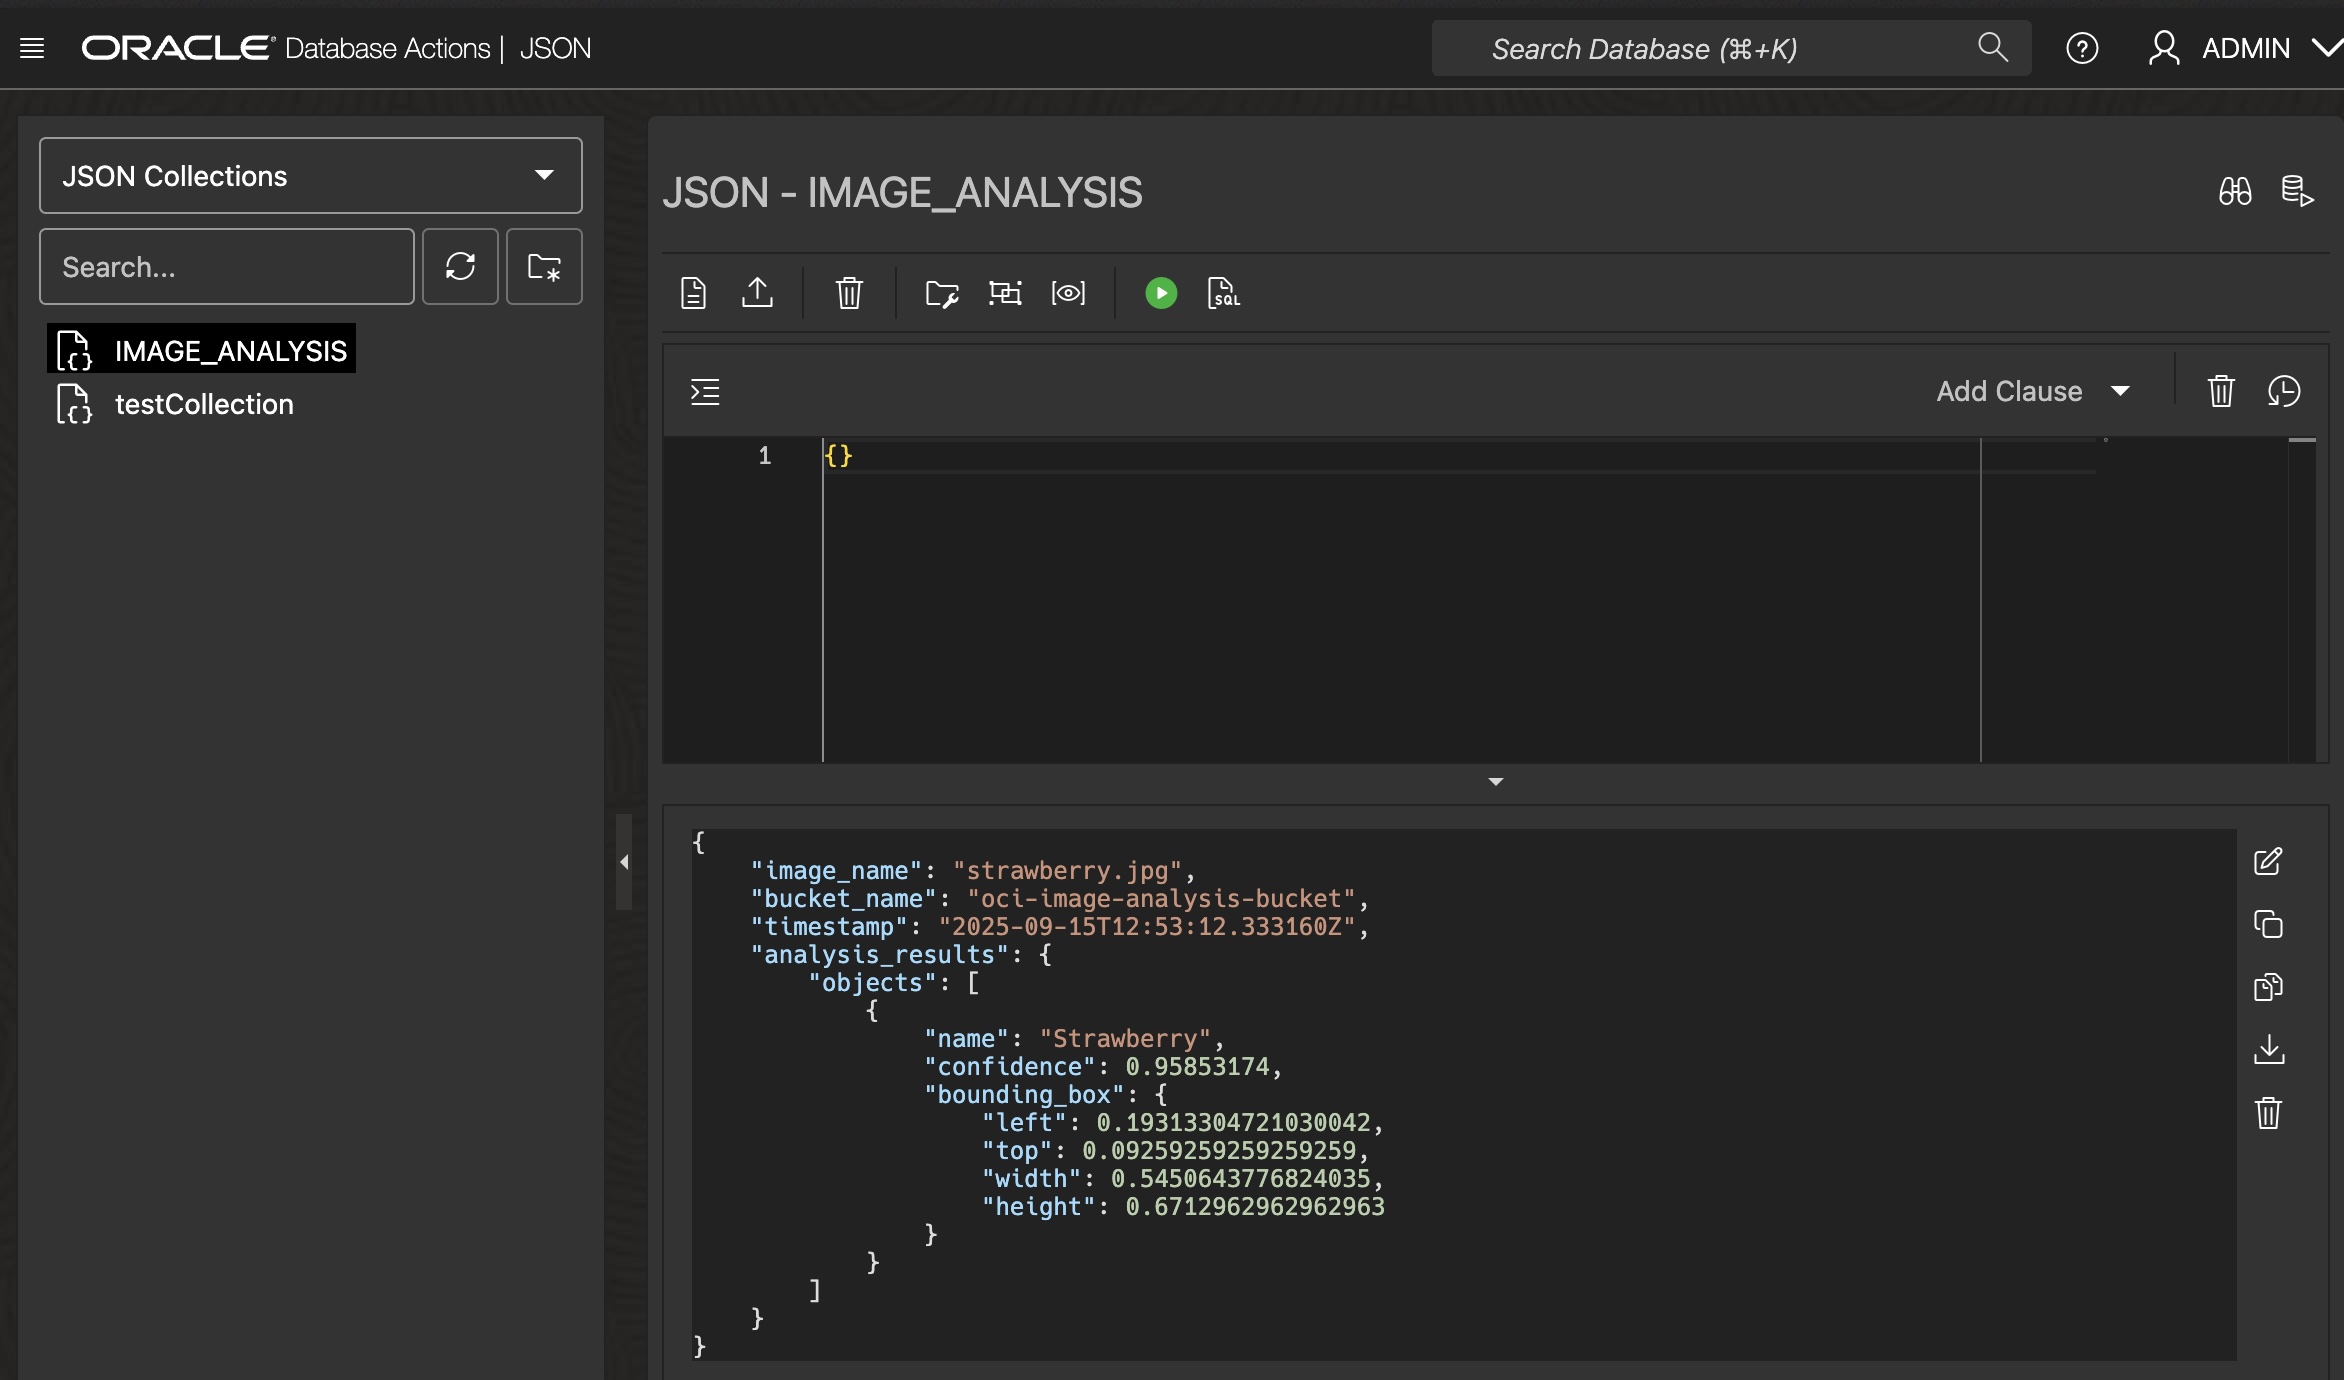
- In the Database Actions launchpad, click the JSON card under the “Development” section.
- You will be taken to the JSON collection editor. You should see the
IMAGE_ANALYSIScollection (table) containing the JSON document for your uploaded image.
Closing Thoughts
This project is more than a tutorial — it’s a reusable pattern for building event-driven, serverless applications on OCI. Using Terraform ensures your architecture is repeatable, and leveraging OCI’s managed services lets you focus on your application logic instead of infrastructure management.
I’ll go deeper into migration strategies and advanced considerations during my Oracle AIWorld session on October 15th. I hope to see you there!
👉 Join me at Oracle AIWorld.
Stay tuned for the public GitHub repository link—and let me know if you build the pipeline!.