

Agentic Enterprise: OCI GenAI Agents Are Secure, Observable, and Scalable (A Step-by-Step Guide)
We are entering an era where applications and infrastructure will be designed with agents that can use tools and create sophisticated workflows. This “agentic” world is more than just a wrapper for an LLM, it’s a foundation that connects models to enterprise data with actions.
This post is a step-by-step walkthrough of deploying OCI’s Generative AI Agent Service as part of a complete enterprise stack.
The use case: Enterprise RAG with guardrails
Building enterprise agents that answer complex questions grounded in your company’s proprietary documents (RAG) requires a production-grade architecture with security, observability, and governance as top priorities.
The architecture we are building handles the heavy lifting of an enterprise deployment:
- Authentication & authorization: only the right users can query the agent.
- Session orchestration: multi-turn conversations across multiple interactions.
- Pre/post processing: data is cleaned and validated before it reaches the model and before it returns to the user.
- Guardrails: built-in protection against PII leaks, prompt injection, and inappropriate content.
What you will be building
In this walkthrough, we will create a complete end-to-end stack:
- Web Front-end (NGINX + TypeScript UI): A user-facing chat interface built in TypeScript (compiled to vanilla JS) served by NGINX. The UI handles markdown rendering, session continuity, and citation display.
- OCI Load Balancer: Distributing traffic to ensure the front-end remains responsive.
- OCI API Gateway: The security and traffic management layer that monitors and protects our HTTP endpoints.
- OCI Serverless Function (Python application): The execution logic that bridges the API Gateway with the Generative AI Agent service.
- OCI Generative AI Agent: A managed Generative AI agent for inferencing with guardrails, RAG, reranking, and a vector embedding knowledge base.
Step-by-Step: from zero to agentic
We aren’t just clicking buttons in the console today. We are building a repeatable, automated pipeline. Now might be a good time to review the GitHub repository and clone it to your local environment.
👉 Github: OCI Generative AI Agent Demo (step-by-step) Repo
1. the environment setup
Before we touch Terraform, we need our local environment ready. You’ll need a Python virtual environment to manage the OCI SDK dependencies and a dedicated .tfvars file for secrets.
# Create and activate a clean environment
python3 -m venv venv-oci
source venv-oci/bin/activate

# Install the OCI SDK
pip install oci
2. Download and configure the OCI CLI
The OCI CLI is the primary interface for testing and secondary automation. Ensure you have your config file (~/.oci/config) properly mapped to your tenancy.
👉 Github: OCI CLI Installation
# Verify your connectivity
oci iam compartment list --compartment-id-in-subtree true
3. creating the OCI Generative AI Agent
Before creating the agent itself, you need to give it something to reason over. The RAG pipeline is grounded in documents you supply, stored in OCI Object Storage and indexed into a vector store. We’ll set that up first, then wire it into the agent.
A. create an Object Storage bucket
The agent’s knowledge base pulls documents from an OCI Object Storage bucket. Create a dedicated bucket to hold your RAG source files:
- Go to Storage → Object Storage & Archive Storage → Buckets.
- Select Create Bucket, give it a name (e.g.,
genai-agent-docs), and leave the defaults (Standard tier, Oracle-managed encryption). - Click Create.
B. upload your knowledge base documents
The agent will index whatever you put in this bucket. For this demo we’ll create a RAG knowledge base grounded in your professional background (like my own CareerStack.app agent). We’ll create plain text markdown files that are structured and will ultimately be chunked and embedded via a pipeline managed by the OCI Generative AI Agent Service.
Create one or more .md files covering the content you want the agent to know. Some examples:
profile.md — your professional summary, skills, and career history
projects.md — descriptions of notable work, architectures you’ve built, and outcomes
certifications.md — certifications, training, and areas of expertise
A sample profile.md might look like (you can create anything that reflects your own background, projects, or certifications):
# Professional Profile

## Summary
Jane Smith is a cloud architect with 15+ years of experience in enterprise
infrastructure, cloud platforms, and AI/ML workloads.

## Core skills
- Cloud Platforms: Oracle Cloud Infrastructure (OCI), AWS, Azure
- Infrastructure as Code: Terraform, Ansible
- AI/ML: LLM orchestration, RAG pipelines, vector search
- Networking: SD-WAN, BGP, data center design

## Recent experience
### Acme corp — senior cloud architect
Leading cloud modernization initiatives, GenAI platform adoption,
and cloud-native architecture design for enterprise customers.
Upload the files to your bucket:
- Open your
genai-agent-docsbucket. - Select Upload, drag in your markdown files, and confirm.
The more structured and specific your documents, the more precise the agent’s answers will be. Headers, bullet points, and clear section labels help the chunking and retrieval pipeline significantly.
C. create the knowledge base
With documents in Object Storage, create a Knowledge Base to index them:
- Go to Analytics and AI → AI Services → Generative AI Agents.
- Select Knowledge Bases → Create Knowledge Base.
- Give it a name (e.g.,
career-stack-kb) and select your compartment. - Under Data sources, select Add data source and choose OCI Object Storage.
- Point it at your
genai-agent-docsbucket and set the file type to Markdown. - Click Create. OCI will ingest and vectorize the documents into an OpenSearch index — this takes a few minutes depending on document volume.
Wait for the Knowledge Base status to show Active before proceeding.
D. create the Agent and endpoint
Now create the agent and attach the knowledge base as a tool:
- Go to Analytics and AI → AI Services → Generative AI Agents.
- Select Agents → Create Agent.
- Give it a name, select your compartment, and choose a model (Meta Llama 3, OpenAI OSS, XAI Grok or Cohere Command R are good defaults for RAG workloads).
- Under Tools, select Add tool → RAG and attach the Knowledge Base you just created.
- Complete the wizard and click Create.
Once the agent is Active, create an endpoint:
- Open the agent and select Endpoints → Create Endpoint.
- Give it a name and click Create.
Once completed, make note of your GenAI endpoint OCID. It will look something like:
ocid1.genaiagentendpoint.oc1.us-chicago-1.amaaaaaaEXAMPLE
You will need this OCID when configuring terraform.tfvars in a later step.
4. the serverless Python application: step-by-step
The OCI Function ociGenAI-Agents/genaiAgent/func.py is the brain connector — it receives a request from the API Gateway, calls the Generative AI Agent service, and returns the response. Here’s how to build and deploy it from your local machine.
A. set up your OCI tenancy
Before writing any code, make sure your tenancy is configured for OCI Functions.
Step 1: Create groups, users, and a compartment
If you don’t already have a dedicated compartment and user group for Functions:
- Sign in to the Console as a tenancy administrator.
- Go to Identity & Security → Identity → Domains → User management.
- Create a group (e.g.,
functions-developers) and a user, then add the user to the group. - Go to Identity & Security → Identity → Compartments and create a compartment (e.g.,
dev).
Step 2: Create a VCN and subnets
OCI Functions requires a Virtual Cloud Network (VCN):
- Go to Networking → Virtual Cloud Networks.
- Select Start VCN Wizard and choose Create VCN with Internet Connectivity.
- Give it a name and complete the wizard. This creates the VCN, public subnet, internet gateway, and route table automatically.
Step 3: Create an IAM policy
Your Functions user group needs explicit permissions to manage and invoke functions. Go to Identity & Security → Policies, create a policy at the root compartment level, and add the following statements (replace <group-name> and <compartment-name> with your values):
Allow group <group-name> to manage functions-family in compartment <compartment-name>
Allow group <group-name> to use virtual-network-family in compartment <compartment-name>
Allow group <group-name> to manage repos in tenancy
Allow group <group-name> to manage logging-family in compartment <compartment-name>
Allow group <group-name> to read metrics in compartment <compartment-name>
Allow service faas to use apm-domains in tenancy
Allow service faas to read repos in tenancy where request.operation='ListContainerImageSignatures'
You also need a policy to let the function call the Generative AI Agent service. This is done via a Dynamic Group:
- Create a Dynamic Group (e.g.,
genai-func-dynamic-group) with the rule:ALL {resource.type = 'fnfunc', resource.compartment.id = '<compartment-ocid>'} - Then add a policy:
Allow dynamic-group genai-func-dynamic-group to manage genai-agent-family in compartment <compartment-name>
B. create a Functions application in the console
- Go to Developer Services → Functions → Applications.
- Select Create application, name it
genai-demo-app, and select the VCN and public subnet you created above.
C. set up your local development environment
Step 1: Install and verify Docker
OCI Functions packages code as Docker images. Confirm Docker is installed and running:
docker version
docker run hello-world
If Docker is not installed, follow the Docker installation docs for your platform.
Step 2: Set up your OCI API signing key
- In the OCI Console, go to your User Settings → Tokens and keys → API keys.
- Select Add API key → Generate API key pair.
- Download the private key (
.pemfile) to~/.oci/. - Copy the generated configuration snippet into
~/.oci/config. - Update the
key_filepath in the config to point to your downloaded.pemfile. - Lock down file permissions:
chmod go-rwx ~/.oci/oci_api_key.pem
Step 3: Install the Fn Project CLI
The Fn CLI is the local toolchain for building and deploying OCI Functions:
# Linux or macOS
curl -LSs https://raw.githubusercontent.com/fnproject/cli/master/install | sh

# macOS with Homebrew
brew update && brew install fn

# Verify the installation
fn version
Step 4: Configure the Fn CLI context for OCI
# Create a new context using the Oracle provider
fn create context genai-demo --provider oracle
fn use context genai-demo

# Point it at your compartment
fn update context oracle.compartment-id <your-compartment-ocid>

# Set the OCI Functions API endpoint for your region
fn update context api-url https://functions.us-chicago-1.oci.oraclecloud.com

# Configure OCIR (OCI Container Registry) — format: <region-key>.ocir.io/<tenancy-namespace>/<repo-name>
fn update context registry ord.ocir.io/<your-tenancy-namespace>/genaifunction

# Optional: set the image compartment
fn update context oracle.image-compartment-id <your-compartment-ocid>
Step 5: Generate an Auth Token and log in to OCIR
OCI Functions pushes Docker images to OCIR. You need an auth token to authenticate:
- In the Console, go to User Settings → Tokens and keys → Auth Tokens → Generate token.
- Copy the token immediately (you will not see it again).
Log in to the registry:
docker login -u '<tenancy-namespace>/<[email protected]>' ord.ocir.io
# When prompted for a password, paste the auth token you just copied
D. deploy the Python Function
The repository includes a ready-to-deploy Python function under genaiAgent/. This function wraps the OCI Generative AI Agent SDK and handles session management.
Key dependencies (requirements.txt):
oci>=2.112.0
fdk>=0.1.105
A notable design detail: func.py uses resource principals for authentication when running inside OCI, with an automatic fallback to the local ~/.oci/config file for development. This means the same code works both locally and in production without any code changes — only the IAM policy distinguishes environments.
Deploy the function:
cd genaiAgent

# Build the Docker image and push to OCIR, then register it with OCI Functions
fn -v deploy --app genai-demo-app
E. testing the Function with fn invoke
Once deployed, test the function end-to-end before wiring up Terraform. The function accepts a JSON body with a userMessage field and an optional sessionId for stateful multi-turn conversations.
Single-turn invocation:
echo '{"userMessage": "What is OCI Generative AI?"}' | fn invoke genai-demo-app genaiagent
Multi-turn stateful conversation:
The function returns a sessionId in its response. Pass that back on subsequent calls to maintain conversation context across turns:
# First turn — no sessionId, agent creates a new session
echo '{"userMessage": "Who is Matt Ferguson?"}' | fn invoke genai-demo-app genaiagent

# Second turn — include the sessionId from the first response
echo '{"userMessage": "What are his key skills?", "sessionId": "<SESSION_ID_FROM_FIRST_RESPONSE>"}' | fn invoke genai-demo-app genaiagent
A successful response will look like:
{
  "response": "Matt Ferguson is a cloud architect and technology leader...",
  "sessionId": "ocid1.genaiagentsession.oc1.us-chicago-1...."
}
You should see a JSON response from your Generative AI Agent. Once this works, your function OCID is ready to feed into Terraform.
F. testing directly with the OCI CLI: myAgent.py
The repository also includes myAgent.py — a lightweight shell script that bypasses the Function and API Gateway entirely, hitting the OCI Generative AI Agent Runtime endpoint directly using the OCI CLI. This is useful for validating your agent configuration in isolation before deploying the full stack.
#!/bin/bash
ENDPOINT="https://agent-runtime.generativeai.us-chicago-1.oci.oraclecloud.com"

oci --profile "GENAI" \
  --endpoint "$ENDPOINT" \
  -- generative-ai-agent-runtime agent-endpoint chat \
  --user-message "Who is Jane Smith" \
  --should-stream false \
  --session-id "ocid1.genaiagentsession.oc1.us-chicago-1.<YOUR_SESSION_OCID>" \
  --agent-endpoint-id "ocid1.genaiagentendpoint.oc1.us-chicago-1.<YOUR_ENDPOINT_OCID>"
To use it, update the two OCID placeholders with your actual values (the session and endpoint OCIDs from Step 3), then run:
chmod +x myAgent.py
./myAgent.py
If the agent responds correctly here, you know the problem isn’t in your infrastructure — it’s isolated to the Function or API Gateway layer. This makes it the right debugging tool when the full stack isn’t behaving as expected.
5. deploying the infrastructure: Terraform Plan, Init, and Apply
With your OCI Function deployed, it’s time to stand up the rest of the stack — Load Balancer, NGINX compute instance, API Gateway, networking, and IAM — all defined in Terraform.
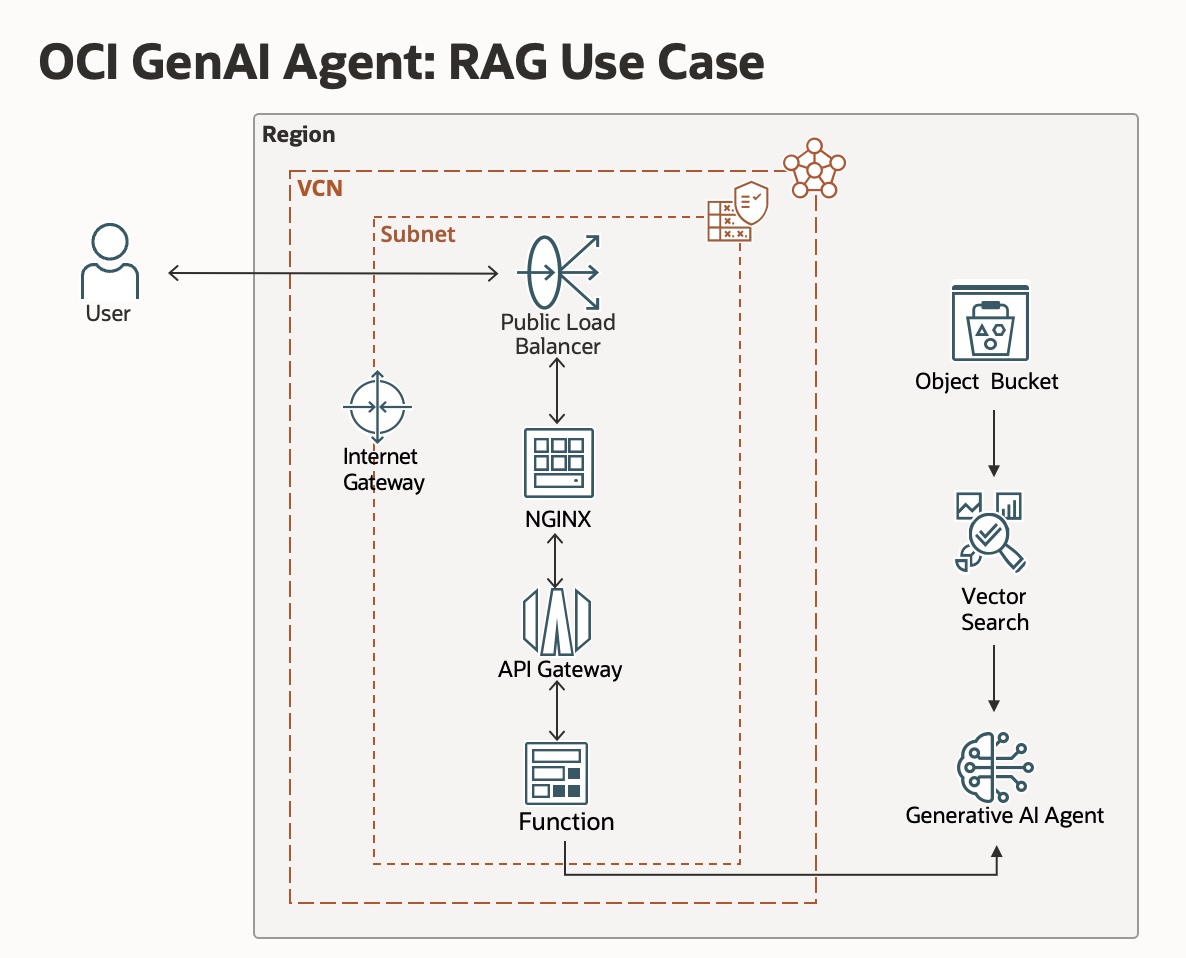
What the Terraform code creates
The main.tf file orchestrates six modules that together form the complete ingress stack:
| Module | What It Creates |
|---|---|
networking |
VCN, public subnet, internet gateway, route table, NSGs for the LB and NGINX |
iam |
Dynamic group and IAM policies so the Function can call the Generative AI Agent |
functions |
OCI Functions application wiring (links to the function image you deployed above) |
api_gateway |
API Gateway + deployment with a route that proxies /chat calls to the Function |
compute_nginx |
A compute instance running NGINX as a reverse proxy and static front-end host |
load_balancer |
A flexible shape Load Balancer fronting the NGINX instance |
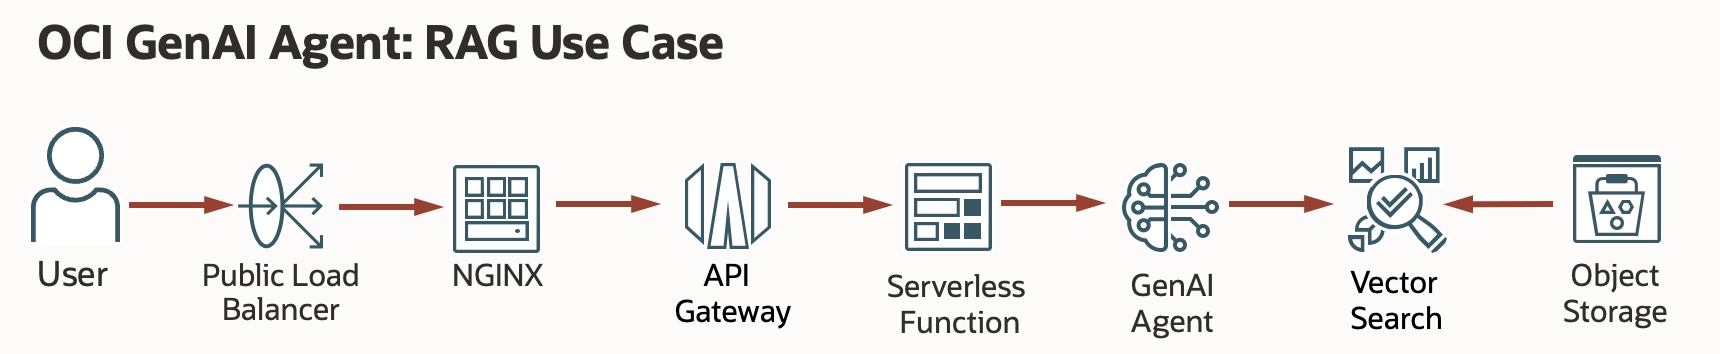
When applied, traffic flows: User → Load Balancer → NGINX → API Gateway → OCI Function → Generative AI Agent.
Step 1: configure terraform.tfvars
Copy the example file and fill in your values:
cd terraform
cp terraform.tfvars.example terraform.tfvars
Open terraform.tfvars and update every placeholder:
# OCI Identity
compartment_ocid     = "ocid1.compartment.oc1..YOUR_COMPARTMENT_OCID"
tenancy_ocid         = "ocid1.tenancy.oc1..YOUR_TENANCY_OCID"
user_ocid            = "ocid1.user.oc1..YOUR_USER_OCID"
api_fingerprint      = "aa:bb:cc:dd:ee:ff:11:22:33:44:55:66:77:88:99:00"
api_private_key_path = "~/.oci/oci_api_key.pem"

# Region & Compute
region              = "us-chicago-1"
availability_domain = "Uocm:CHICAGO-1-AD-1"
instance_image_ocid = "ocid1.image.oc1.us-chicago-1.YOUR_IMAGE_OCID"
ssh_authorized_keys = "ssh-ed25519 AAAA... you@yourmachine"

# Agent & Function
agent_endpoint_ocid  = "ocid1.genaiagentendpoint.oc1.us-chicago-1.YOUR_ENDPOINT_OCID"
agent_runtime_region = "us-chicago-1"
function_image       = "ord.ocir.io/<your-tenancy-namespace>/genaifunction/genaiagent:latest"
ocir_repo_name       = "genaifunction"

label_prefix = "genai-demo"
Where to find these values:
compartment_ocid: OCI Console → Identity & Security → Compartmentstenancy_ocid: OCI Console → Profile menu → Tenancyuser_ocid: OCI Console → Profile menu → User settingsapi_fingerprint: OCI Console → User settings → API keysavailability_domain:oci iam availability-domain list --compartment-id <compartment-ocid>instance_image_ocid: OCI Console → Compute → Images (choose Oracle Linux 8 or Ubuntu 22.04)agent_endpoint_ocid: The OCID from Step 3 abovefunction_image: The OCIR path from yourfn deploystep
Step 2: initialize Terraform
terraform init downloads all required providers (the OCI provider) and initializes the module tree:
terraform init
Expected output:
Initializing modules...
- networking in ./modules/networking
- iam in ./modules/iam
- functions in ./modules/functions
- api_gateway in ./modules/api_gateway
- compute_nginx in ./modules/compute_nginx
- load_balancer in ./modules/load_balancer

Initializing the backend...
Initializing provider plugins...
- Finding hashicorp/oci versions matching "~> 6.0"...
- Installing hashicorp/oci v6.x.x...

Terraform has been successfully initialized!
Step 3: review the Plan
Before creating anything, review what Terraform intends to do:
terraform plan
You should see roughly 30–40 resources planned for creation, including:
- 1 VCN + 1 public subnet + internet gateway + route tables + NSGs
- 1 API Gateway + 1 deployment + 1 route
- 1 OCI Functions application
- 1 Compute instance (NGINX)
- 1 Load Balancer + backend set + listener
- IAM dynamic group + policies
Review the output carefully. If you see any Error: lines at this stage, they are almost always misconfigured values in terraform.tfvars (wrong OCID format, missing region, etc.).
Step 4: Apply
When the plan looks correct, apply it:
terraform apply
Type yes when prompted. Provisioning typically takes 5–10 minutes. The Load Balancer and compute instance take the longest.
Expected outputs
Once apply completes, Terraform prints the following outputs:
Outputs:

api_gateway_invoke_url    = "https://abcdef1234.apigateway.us-chicago-1.oci.customer-oci.com/v1"
compute_public_ip         = "129.xx.xx.xx"
demo_base_url             = "http://xxx.xxx.xxx.xxx"
function_id               = "ocid1.fnfunc.oc1.us-chicago-1..."
functions_application_id  = "ocid1.fnapp.oc1.us-chicago-1..."
load_balancer_public_ip_addresses = ["xxx.xxx.xxx.xxx"]
Open the demo_base_url in your browser to verify the end-to-end stack is working.
Troubleshooting
Error: 404 NotAuthorizedOrNotFound during apply
The Terraform service account or user doesn’t have permission to create one of the resources. Double-check the IAM policies for your compartment and make sure allow service faas to read repos in tenancy is in place.
Load Balancer stuck in CREATING state
This usually resolves itself within a few minutes. If it persists, check the subnet’s security list rules — port 80 must be open for ingress.
Function invocation returns 502 Bad Gateway from API Gateway
The function deployed but isn’t responding correctly. Check the function logs:
fn logs get genai-demo-app genaiagent
Common cause: agent_endpoint_ocid in terraform.tfvars is incorrect or the dynamic group policy is missing.
terraform plan shows no changes but the agent still isn’t working
If you deployed the function manually with fn deploy before running Terraform, and you’re using manual_function_id in tfvars, confirm that OCID is correct. Terraform won’t re-deploy functions it doesn’t manage.
NGINX returning a blank page
SSH into the compute instance (compute_public_ip) and check the NGINX configuration:
sudo systemctl status nginx
sudo cat /etc/nginx/conf.d/app.conf
The api_gateway_url should be embedded correctly in the NGINX config by the Terraform compute_nginx module.
6. the ingress stack: LB → NGINX → API gateway
To make this agentic, it must be accessible. We wrap the agent in a standard enterprise ingress pattern:
- OCI Load Balancer: Entry point for all traffic. The flexible-shape load balancer distributes requests to the NGINX backend set over port 80.
- NGINX (Web Layer): Handles two jobs — serving the static TypeScript chat UI from
public/and acting as a reverse proxy that forwards/askPOST requests upstream to the API Gateway. Terraform injects the API Gateway invoke URL directly into the NGINX config via cloud-init at boot, so there’s no manual configuration step. - OCI API Gateway: The guardrail layer — validating requests, enforcing rate limits, emitting access and execution logs at INFO level, and routing
POST /v1/askto the OCI Function backend. This is where you would add JWT authentication or OAuth policies for production workloads.
Traffic flows in one direction: Browser → Load Balancer → NGINX → API Gateway → OCI Function → Generative AI Agent Runtime. Each hop adds a layer of control without coupling them together — you can swap the front-end or tighten the API Gateway policy without touching the function code.
The chat UI
The TypeScript source in src/app_client.ts compiles down to a single self-contained JavaScript file served by NGINX. The UI handles:
- Markdown rendering — bold, italics, ordered/unordered lists, headings, and hyperlinks in agent responses
- Session tracking — stores the
sessionIdreturned by the function and passes it on every subsequent request, giving you multi-turn conversation state in the browser - Citation display — renders source annotations returned by the RAG pipeline alongside responses
- Stop button — uses the browser’s
AbortControllerAPI to cancel in-flight requests
The three pre-built prompt chips wired into the UI demonstrate the agent’s capabilities on load, making it easy for someone landing on the demo to see the agent in action without typing anything.
Tracing the agentic workflow
In this architecture, the flow changes from a simple query to a multi-step execution. With the RAG knowledge base attached, here’s what happens when a user submits a question:
The browser sends POST /ask with the user’s message and session ID. NGINX proxies it to API Gateway, which forwards it to the OCI Function. func.py checks for an existing session — if there isn’t one, it calls the GenAI Agent Runtime to create one and stores the returned sessionId. The agent then queries the OpenSearch vector store, retrieves the most relevant chunks from the knowledge base, and passes them to the LLM (Llama 3 or Cohere Command R) to ground the response. The function returns the answer and sessionId as JSON, and the chat UI renders the markdown with any citations inline.
Because the session ID is preserved across turns, follow-up questions like “What certifications does she hold?” carry full conversation context — the agent knows what was just asked and can answer coherently without re-explaining the premise.
Why this matters: the middle layer
By building this on OCI, we are using a high-performance substrate that connects the agent directly to the data via a high-speed, multiplanar network. This isn’t just a chatbot; it’s a piece of infrastructure that understands your business and acts with low-latency access to your primary data sources.
What’s next?
We’ve moved from “Packets” to “Agentic Infrastructure.” The next step is scaling this across multiple departments using agent-to-agent (A2A) collaboration. Imagine a Supply Chain Agent talking to a Finance Agent to optimize logistics in real-time.
If you’re ready to build the future of enterprise automation, the tools are ready on OCI.
Follow me on LinkedIn for more updates as we continue to explore the Internet of Agents.